Vegan Red Velvet Pumpkin Cake
This sculpted vegan pumpkin cake is sure to impress at your next Halloween party or Fall event. Cut into this impressive red velvet cake covered in creamy hazelnut Swiss meringue buttercream.
Servings 1 large 9-inch cake
Ingredients
Red velvet bundt cake
Dry ingredients
- 900 g unbleached all-purpose flour (7 ½ cups)
- 95 g unsweetened cocoa powder (¾ cup)
- 60 g cornstarch (⅓ cup + 2 tablespoons)
- 600 g white granulated sugar (3 cups)
- 20 g baking powder (1 ½ tablespoons)
- 7.5 g baking soda (1 ½ teaspoons)
- 9 g fine sea salt (1 ½ teaspoons)
Wet ingredients
- 22 g white vinegar (1 ½ tablespoon)
- 840 g plant-based milk of your choice , I use soy milk (3 ⅓ cups)
- 240 g room temperature vegan margarine (1 cup)
- 285 g light-tasting vegetable oil , I use canola oil (1 ¼ cup)
- 250 g Aquaflaxa , see notes (1 cup)
- 100 g plain vegan yogurt , or blended silken tofu (⅓ cup + 1 tablespoon)
- 18 g vanilla extract (1 ½ tablespoons)
- 17 g concentrated vegan red food gel coloring ,adjust to your desired color. see notes (1 tablespoon)
Hazelnut Swiss Meringue buttercream (SMBC)
- 1 batch vegan Swiss meringue buttercream
- 120 g Torani Classic Hazelnut Syrup (6 tablespoons)
- Orange and dark brown concentrated gel food coloring
- Orange, red, gold and copper edible luster dust
Instructions
Red velvet bundt cake
- Preheat your oven to 325°F (165°C).
- In the bowl of a stand mixer or a large mixing bowl, sift together all the dry ingredients.
- In a smaller non-metallic bowl, mix together the plant-based milk and vinegar and set aside for 5 minutes.
- Add the room-temperature margarine to the bowl with the dry ingredients, and with the paddle attachment or an electric mixer on low speed, mix it into the flour until you reach a sand-like texture, or about 2 minutes.
- Add the rest of the wet ingredients and the milk and vinegar mixture all at once into the dry ingredients and mix on low until there are no more dry ingredients left. Scrape the sides of your bowl with a silicone spatula from time to time to dislodge any dry ingredients stuck to the side of the bowl. Mix in the food coloring and adjust to your desired color. Do not overmix.
- Lightly oil the inside of a 9-inch (23 cm) bundt cake pan and pour half of the cake batter ( approximately 1.7 kg per cake) into the prepared pan. Tap lightly the cake pan against your countertop 3 to 5 times to release any trapped air bubbles and smooth out the top of the cake.
- Bake the cake in the middle rack for approximately 1 hour, or until a toothpick inserted in the middle of the cake comes out clean and free of crumbs.
- Let the cake rest in the cake pan for 10 minutes before inverting it on top of a wire rack and leaving it to cool completely.
- Repeat the baking and cooling process with the other half of the cake batter so that you have 2 identical red velvet bundt cakes.
Hazelnut Swiss Meringue buttercream (SMBC)
- Whip up a batch of vegan Swiss meringue buttercream.
- When the buttercream has finished whipping, change the attachment on your stand mixer for the paddle. Add the hazelnut syrup to the buttercream and adjust the amount of syrup to taste. Beat on low for 5 minutes, or until there are no more large air bubbles in the cream.
- Put approximately 1 ½ cups of white hazelnut SMBC aside for filling the cake. Color approximately 1 cup of icing a dark brown color and place in a piping bag with a small round pastry tip. Color the rest of the icing a deep orange color and place it in a pastry bag with a large smooth round pastry tip.
Assembly
- Level both bundt cakes using a sharp serrated knife by removing the domed and uneven top of each cake. Keep the trimmings.
- On a cake board or drum, add a small dab of icing to act as glue and place your first bundt cake flat side up. Spread a layer of white hazelnut SMBC from edge to edge on the top layer of the cake. Place the second blunt cake, flat side down on top of the layer of icing to make a donut-shaped cake. Take the cake trimmings from the previous step and place them in the hole in the center of the cake to fill it up. Alternative: place a small bowl where the hole in the center of the cake is to act as a barrier for icing not to fall through. Refrigerate the cake until the icing layer is firm.
Decorating
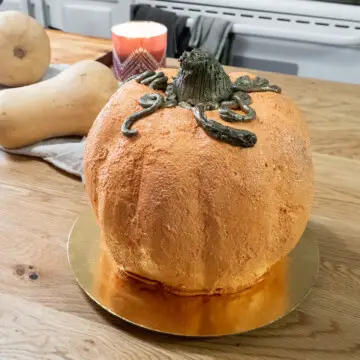
- On a piece of parchment paper placed on top of a firm surface, pipe in a circular motion to make a cylinder shape out of dark brown buttercream to make the pumpkin stem. Smooth out the outside of the buttercream cylinder with a small offset spatula and refrigerate until firm.
- Crumb coat the cake using the orange buttercream and refrigerate until cold and firm.
- Apply a second, thicker coat of orange buttercream to the cake. Mark where you want the pumpkin ridges to be on the cake and then start smoothing out and shaping the buttercream using the tip of a small offset spatula. Add buttercream in the middle of the sections you made to give a 3D effect to the cake.
- Then, using a piece of sturdy coated cardboard or acetate sheet, smooth any imperfections on the cake. You might need to slightly curve the cardboard or cut it to get into hard to reach nooks and crannies. Refrigerate the cake until firm, or about 30 minutes.
- Once the buttercream on the cake is firm to the touch, press a textured paper towel on the surface of the buttercream and rub lightly with your hand before removing the paper towel to leave a slight imprint on the cake for realism. If the paper towel starts to stick, place the cake back in the refrigerator until cold.
- Using the leftover dark brown buttercream, pipe some vines and an anchor for the stem on top of the pumpkin. Place the cold and firm stem on top of the pumpkin and then trim it to size. Optional: drag the tip of a small offset spatula on the stem to add some texture.
- Brush or blow some luster dust on the pumpkin to create additional accents either on the flesh or stem.
- Keep the cake in the refrigerator and place at room temperature 1 hour before serving it. Enjoy!
Notes
aquaflaxa substitution: You can use a traditional flax egg. Mix together 28 g (¼ cup) finely ground flaxseeds with 187g (¾ cup) boiling water and let them cool down before using)